Today, we’re going to talk about how to grow black sesame seeds. The seeds are small, flat seeds, known for their rich, nutty flavor and high nutritional value. They’re a popular ingredient in many cuisines around the world, especially in Asian dishes. But did you know that you can grow these little gems right in your own backyard? Yes, you can! And I’m here to guide you every step of the way.
Black Sesame Basics
| Topic | Information |
|---|---|
| Common Name | Black Sesame |
| Scientific Name | Sesamum indicum nigrum |
| Days to Harvest | 90-130 days |
| Height | Up to 48″ |
| Flower Color | Light pink to light purple |
| Light | Full Sun |
| Soil | Well-draining, loamy or sandy |
| Water | Moderate, drought-tolerant |
| Fertilizer | Balanced |
| Pests | Aphids, leafhoppers |
| Diseases | Fungal diseases, especially in wet conditions |
Understanding Sesame Plant
Types of Sesame Seeds
There are several types of sesame seeds, including white, brown, and black. The black sesame seeds are the most nutritious and flavorful, making them a favorite among chefs and health enthusiasts alike. They’re also the ones we’ll focus on in this guide about how to grow black sesame seeds.
Ideal Climate for Sesame Plants
Sesame plants love the heat. They thrive in areas with long, warm growing seasons, typically between 75 and 100 degrees Fahrenheit. If you live in a cooler climate, don’t worry! You can still grow black sesame seeds indoors.
Enjoy the Ornamental Blooms
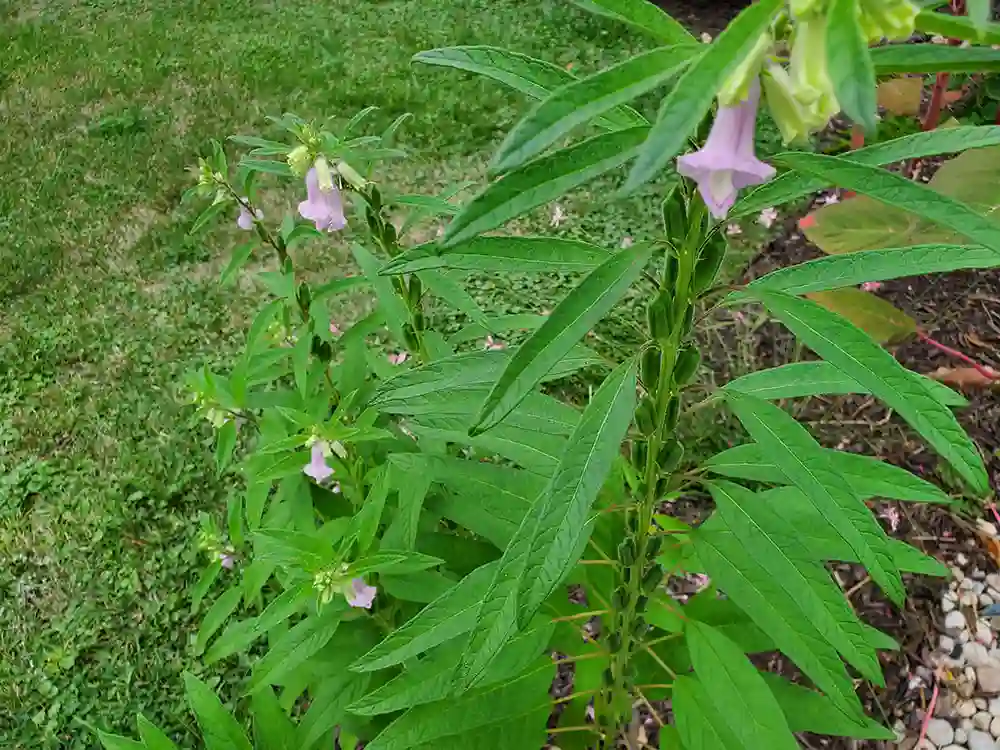
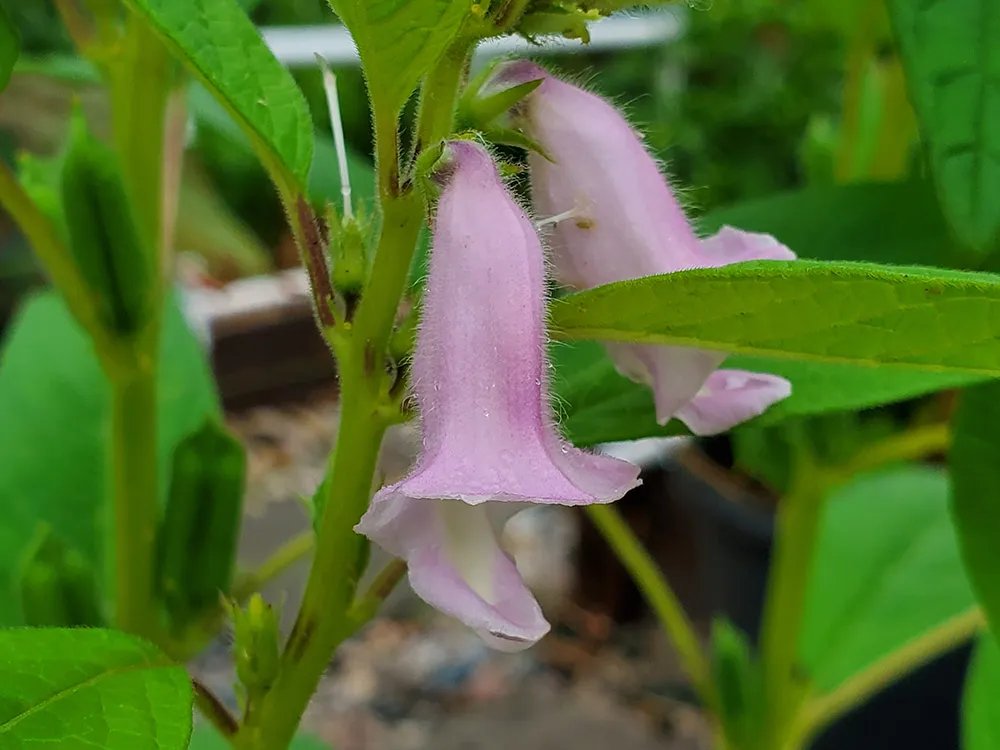
The flowers of the black sesame plant are quite beautiful and add to the aesthetic appeal of the plant. The flower color can vary from light pink, pale lavender to light purple. Some flowers even have pale lavender lines or tinted lower margins, adding to their visual appeal.
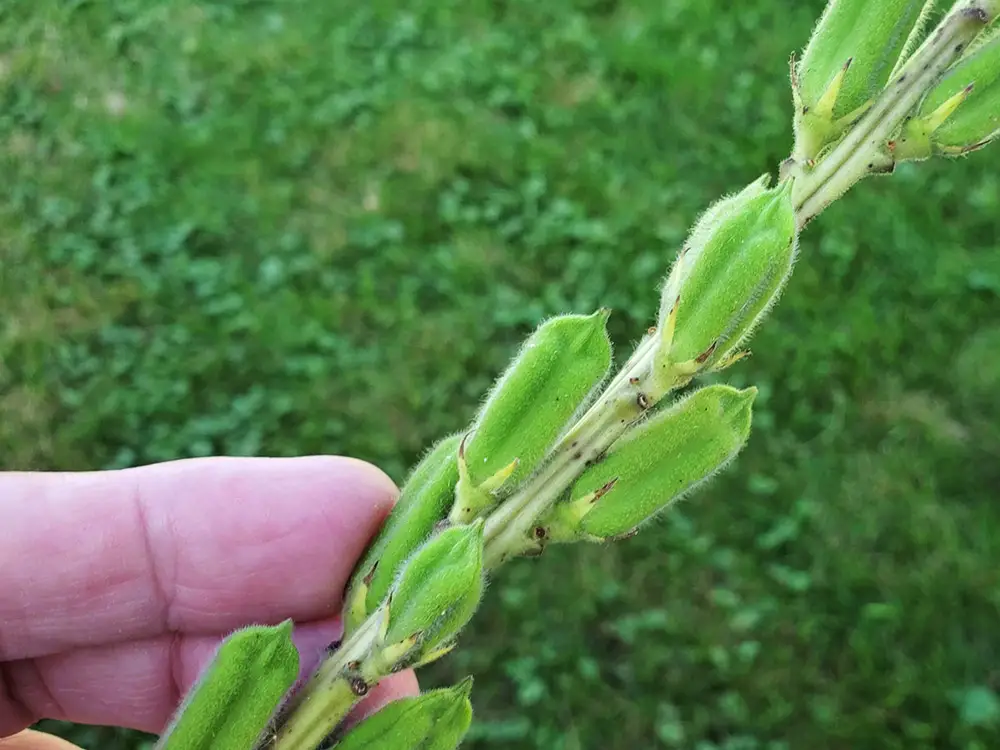
The living plant color is in shades of green, extending from yellow-green to fern green. The plants can reach 48″ tall and usually single-stemmed occasionally producing lower branches. Flowers appear along the main stalk as the plant grows. When the flowers wither a seed pod will grow in its place.
The black sesame plant not only provides nutritious seeds but also adds beauty to your garden with its lovely flowers.
Starting Black Sesame from Seed

It’s a rewarding experience to grow black sesame seeds from scratch. It’s like watching a tiny miracle unfold right before your eyes. Let’s delve deeper into the process.
Indoor vs Outdoor Planting
The choice between indoor and outdoor planting largely depends on your local climate. Sesame plants love warmth and sunlight. If you live in a region with a long, hot summer, you can plant the seeds directly outdoors.
However, if your area has a cooler climate, starting from seed indoors is your best bet. This way, you can get a jumpstart on the season and ensure optimal growing conditions for your seeds.
Starting from Seed Indoors
To grow black sesame seeds indoors, you’ll need a pot, some well-draining soil, and a warm, sunny spot in your home. Here’s a step-by-step guide:
- Prepare the container: Fill a seed tray or pot with well-draining seed starting mix. Sesame seeds aren’t too picky about the soil type, but they do prefer a well-draining one. This prevents waterlogging and root rot.
- Plant the seeds: Plant the seeds about 1/4 inch deep. This depth is ideal as it allows the seeds to receive enough warmth and moisture without being exposed to harsh conditions.
- Water the seeds: After planting, water the seeds lightly. You want to keep the soil moist but not soggy. Overwatering can lead to fungal diseases.
- Place the pot in a sunny spot: Sesame plants love sunlight. Place the pot in a spot that receives at least 6 hours of sunlight a day or use a grow light.
- Wait for the sprouts: With the right conditions, you should see sprouts in about a week. This is the first sign that your seeds are growing!
Planting Sesame Seeds Outdoors
You can also grow black sesame seeds by starting outdoors. However, you’ll need to wait until the soil has warmed up to at least 70 degrees Fahrenheit. Here’s how to do it:
- Prepare the soil: Loosen the soil with a garden fork or tiller. This improves aeration and makes it easier for the seeds to germinate.
- Plant the seeds: Plant the seeds 1/4 inch deep and 1 inch apart in rows 2 feet apart. This spacing allows the plants to have enough room to grow without competing for nutrients.
- Water the seeds: After planting, water the seeds well. Keep the soil consistently moist until the seeds germinate.
- Wait for the sprouts: With enough sunlight and warmth, you should see sprouts in about a week. Congratulations, you’re on your way to growing your own black sesame plants!
Remember, patience is key when growing plants from seeds. It might take a while before you see any progress, but the wait will be worth it when you see those tiny sprouts pushing through the soil.
Transplanting Sesame Seeds
Transplanting is a crucial step in the journey of how to grow black sesame plant from seed. It involves moving the young plants from their initial growing location (usually indoors) to their final growing location (usually outdoors). Let’s explore this process in more detail.
Soil Requirements for Sesame Plants
Sesame plants are quite adaptable and can grow in a variety of soil types. However, they prefer well-draining soil with a pH between 5.5 and 6.7. Loamy or sandy soil is ideal. Before transplanting, prepare the soil by removing any weeds and breaking up any large clumps. This ensures that the roots can penetrate the soil easily.
When to Transplant Sesame Seeds Outdoors
The best time to transplant sesame seeds outdoors is when the danger of frost has passed and the soil has warmed up. This is usually in late spring or early summer, depending on your local climate.
Here’s a step-by-step guide on how to transplant your sesame plants:
- Harden off the plants: Before transplanting, you’ll need to harden off your plants. This involves gradually exposing them to outdoor conditions over a period of a week or two. Start by placing them outside in a sheltered spot for a few hours a day, gradually increasing the time and exposure to wind and sun. This helps the plants adjust to the outdoor conditions and reduces transplant shock.
- Prepare the planting site: Choose a sunny spot in your garden and prepare the soil. Remove any weeds and break up any large clumps. If the soil is poor, you can improve it by adding some compost or well-rotted manure.
- Transplant the plants: Dig a hole for each plant, making it deep enough to cover the root ball. Place the plant in the hole, making sure it’s at the same depth as it was in its original pot. Fill in the hole with soil, firming it gently around the base of the plant.
- Water the plants: After transplanting, water the plants well. This helps settle the soil around the roots and reduces transplant shock.
- Care for the plants: After transplanting, keep an eye on your plants. Water them regularly, especially during dry periods. Also, watch out for pests and diseases.
Remember, the key to successful transplanting is to minimize stress to the plants. Be gentle when handling them, and make sure they’re well-watered and well-cared for after transplanting. With a little care and attention, your sesame plants should thrive in their new location.
Caring for Your Sesame Plant

Once you’ve successfully transplanted your sesame plants, the next step in your journey to grow black sesame seeds is to take good care of them. This involves watering, fertilizing, and protecting them from pests and diseases. Let’s discuss each of these aspects in more detail.
Watering and Fertilizing Sesame Plants
Sesame plants are quite drought-tolerant, which means they can survive with less water than many other plants. However, they’ll produce more seeds if they get regular water.
The key is to water them deeply but infrequently. This encourages the roots to grow deep into the soil, making the plants more resilient in dry conditions.
As for fertilizing, a balanced fertilizer will do just fine. Apply it according to the package instructions, usually once or twice during the growing season.
Common Pests and Diseases of Black Sesame Plants
| Pests/Diseases | Symptoms | Control Measures |
|---|---|---|
| Aphids | Yellowing and curling of leaves, stunted growth | Use organic insecticides or introduce beneficial insects like ladybugs |
| Leafhoppers | Yellowing and curling of leaves, stunted growth | Use organic insecticides or introduce beneficial insects like spiders and lacewings |
| Fungal Diseases | Yellowing leaves, spots, wilting | Avoid overwatering, ensure good air circulation, use fungicides if necessary |
Remember, the best way to keep your plants healthy is to provide them with the right growing conditions and to catch any problems early.
Harvesting and Storing Sesame Seeds
After all the hard work of planting, caring, and nurturing your sesame plants, it’s finally time to reap the fruits of your labor. Harvesting and storing sesame seeds properly is crucial to ensure their quality and longevity. Let’s delve into the process.
When and How to Harvest Sesame Seeds
Sesame seeds are ready to harvest when the pods turn brown and begin to crack open. This usually happens about 100 to 130 days after planting. Here’s how to harvest your sesame seeds:
- Check the pods: The pods should be dry and brown, and the seeds inside should be black. You can check by picking a pod and opening it. If the seeds are black and the pod cracks open easily, it’s time to harvest.
- Cut the plants: Use a sharp pair of scissors or pruners to cut the whole plant at the base. Be careful not to shake the plants too much, as this can cause the seeds to fall out.
- Dry the plants: Hang the plants upside down in a paper bag, dry, well-ventilated place. This allows the seeds to dry further and fall out of the pods naturally.
- Collect the seeds: Place a tarp or a large piece of cloth under the hanging plants to collect the seeds as they fall out. You can also shake the plants gently to help release the seeds.

How to Store Sesame Seeds
Proper storage is key to maintaining the quality of your sesame seeds. Here’s how to store them:
- Clean the seeds: Remove any plant debris from the seeds. You can do this by winnowing, which involves tossing the seeds in the air and letting the wind blow away the lighter debris.
- Dry the seeds: Spread the seeds out in a thin layer and let them dry for a few more days. This ensures that they’re completely dry, which is important for preventing mold during storage.
- Store the seeds: Place the seeds in an airtight container, such as a glass jar with a tight-fitting lid. Store the container in a cool, dry place away from direct sunlight.
- Check the seeds: Check the seeds occasionally to make sure they’re not developing mold. If you see any signs of mold, remove the affected seeds immediately.
With proper harvesting and storage, your sesame seeds can last up to two years. So, you can enjoy the fruits of your labor long after the growing season is over.
Culinary Uses for Black Sesame Seeds
The seeds are not just a beautiful garnish on your dishes, they are also packed with flavor and have a wide range of uses in the kitchen. Here are some ways you can incorporate these tiny, nutrient-dense seeds into your meals.
Adding a Crunch to Your Salads and Stir-fries
Black sesame seeds can add a delightful crunch and a nutty flavor to your salads and stir-fries. Just sprinkle a handful of toasted seeds over your dish before serving. They pair well with a variety of vegetables and proteins, making them a versatile ingredient in your kitchen.
Enhancing Your Baked Goods
Use them to add a visual contrast and a unique flavor to your baked goods. You can sprinkle them on top of bread, muffins, or cookies before baking. They can also be mixed into the dough for an extra crunch.
Making Tahini and Hummus
Black sesame seeds can be ground into a paste, known as tahini, which is a key ingredient in hummus and many other Middle Eastern dishes. Black tahini has a deeper, richer flavor compared to its white counterpart and can add a unique twist to your recipes.
Creating Flavorful Desserts
In many Asian cuisines, the seeds are often used in desserts. They can be ground into a fine powder and mixed with sugar to create a sweet filling for pastries. Black sesame paste is also a popular ingredient in sweet soups and ice cream.
Boosting Your Breakfast
Black sesame seeds can be a great addition to your breakfast. Sprinkle them over your oatmeal, yogurt, or smoothie bowls for a nutrient boost. They can also be mixed into granola or used as a topping for pancakes.
Remember, to get the most flavor out of your black sesame seeds, toast them lightly before using. This will enhance their nutty flavor and make them even more delicious. So, next time you’re in the kitchen, don’t forget to reach for the black sesame seeds!
Conclusion
When you grow black sesame seeds, you’ll first get to enjoy the pretty towers of flowers, then enjoy the fruits (or seeds) of your labor in your cooking. Remember to provide your plants with plenty of sun, water them regularly but not excessively, and protect them from pests. With a little patience and care, you’ll be on your way to a bountiful harvest.
And there you have it, my friend! Now you know how to grow black sesame plant from seed. So, what are you waiting for? Get your hands dirty and start planting!
FAQ: Grow Black Sesame Seeds
Is black sesame annual or perennial?
Black sesame is an annual plant. It completes its life cycle, from germination to the production of seeds, within one growing season.
Should you soak sesame seeds before planting?
Soaking sesame seeds before planting is not necessary. However, it can help speed up germination by softening the seed coat.
Is sesame hard to grow?
Growing sesame is not particularly hard. It requires warm temperatures, well-draining soil, and regular watering. It’s also drought-tolerant, making it a relatively low-maintenance plant.
Are black sesame seeds healthier than white?
Black sesame seeds are slightly more nutritious than white ones. They contain higher amounts of antioxidants and calcium. However, both types are healthy and rich in nutrients.
Can you eat raw sesame seeds?
Yes, you can eat raw sesame seeds. However, toasting them can enhance their flavor and make them more digestible.


